Introduction
The CFDI (Comprobante Fiscal Digital por Internet) is the standardized electronic invoicing format in Mexico, managed by the country’s tax authority, the SAT (Servicio de Administración Tributaria). This system ensures that all fiscal documents are digitally generated, validated, and reported to SAT in compliance with national tax laws. In this guide we’ll walk you through the steps required to first register a supplier and then issue invoices in their name.Prerequisites
To issue invoices in Mexico via the SAT, you will need:- Supplier Information:
- Name
- Taxpayer ID (RFC - Registro Federal de Contribuyentes)
- Address
- Fiscal regime code (as defined by SAT)
- Customer Information (same as supplier, plus):
- CFDI use code (Código de uso CFDI)
- Line items:
- Quantity, unit price, and applicable tax rates
- SAT product/service code (Clave Producto-Servicio)
- Additional requirements
- Selected invoice series
- Place of issue code (Lugar de expedición)
- Two certificates required by the SAT:
- e.firma (FIEL): Confirms your identity before SAT. Required to obtain the CSD below and to authorize the PAC to issue on your behalf as explained in step 3 of the Register a Supplier section below.
- CSD (Certificado de Sello Digital): Required to sign electronic invoices and prove they were issued by you.
Setup
Configure your Invopop workspace for CFDI invoicing by following these steps in the Invopop Console:These instructions apply to both the sandbox and live environments, with a few exceptions related to supplier data and registration details when real information is not available.
1
Set up the Supplier Post-Registration Workflow
2
Set up the Supplier Registration Workflow
- Template
- Code
- Build from scratch
3
Connect the SAT Mexico App
In the left sidebar, under the Configuration section, click Apps. This will display all available apps.Search for SAT Mexico and click Connect. The app will move to the “Enabled Apps” section.Next, click Configure. This will open a dialog on the right with two fields:
- Environment: Sandbox / Live
- Post-registration workflow: SAT supplier post-registration
4
Set up the SAT Issue Invoice Workflow
- Template
- Code
- Build from scratch
Running
Learn how to register a business entity (supplier) and issue CFDI invoices:Register a Supplier
Registering a business entity requires uploading the CSD to our local provider, SW Sapiens, via a form (see Step 2: Complete Supplier Registration). This upload goes to either the sandbox or live environment, depending on your SAT Mexico App configuration. Each CSD is tied to an RFC. When you submit an e-invoice, including the supplier’s RFC, SW Sapiens checks for a valid CSD linked to it, as SAT requires a valid certificate to issue invoices.To speed things up, we’ve pre-registered all the test CSDs listed on the SW Sapien test page in the sandbox.If you’re working in sandbox, you can either:
- Skip this section and go straight to Send an Invoice using a test RFC, or
- Register your own certificate by following the steps below.
1
Run the Supplier Registration Workflow
In the left sidebar, go to the Parties section and click Suppliers.Then click +New Supplier and enter the supplier’s data manually using the console, or switch to developer mode (Click Build, make sure there are no errors, then click Save.Next, click Select Workflow and execute the Supplier Registration Workflow.
</> icon) to paste the data directly.Here is an example supplier for reference:SAT Mexico supplier example
2
Complete Supplier Registration
After it completes, open the Details window and click on Meta. You should see a section called Registration Link with a URL: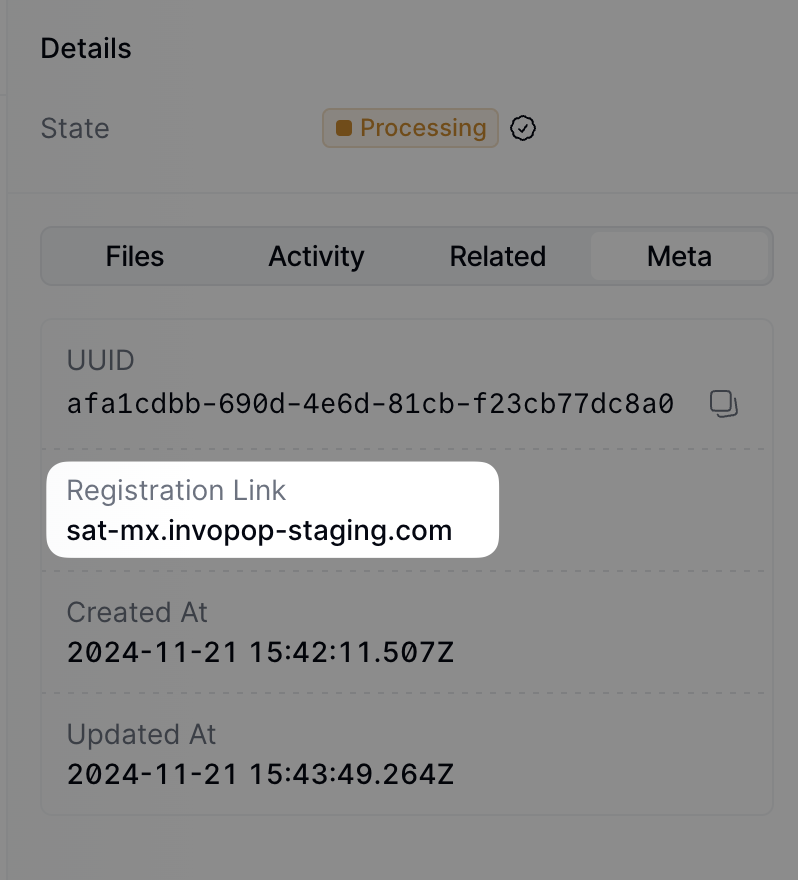
You can access the registration link via the API by fetching the silo entry and locating the meta entry where the key is
registration-link.Note that this form can be shared directly with the supplier if required.
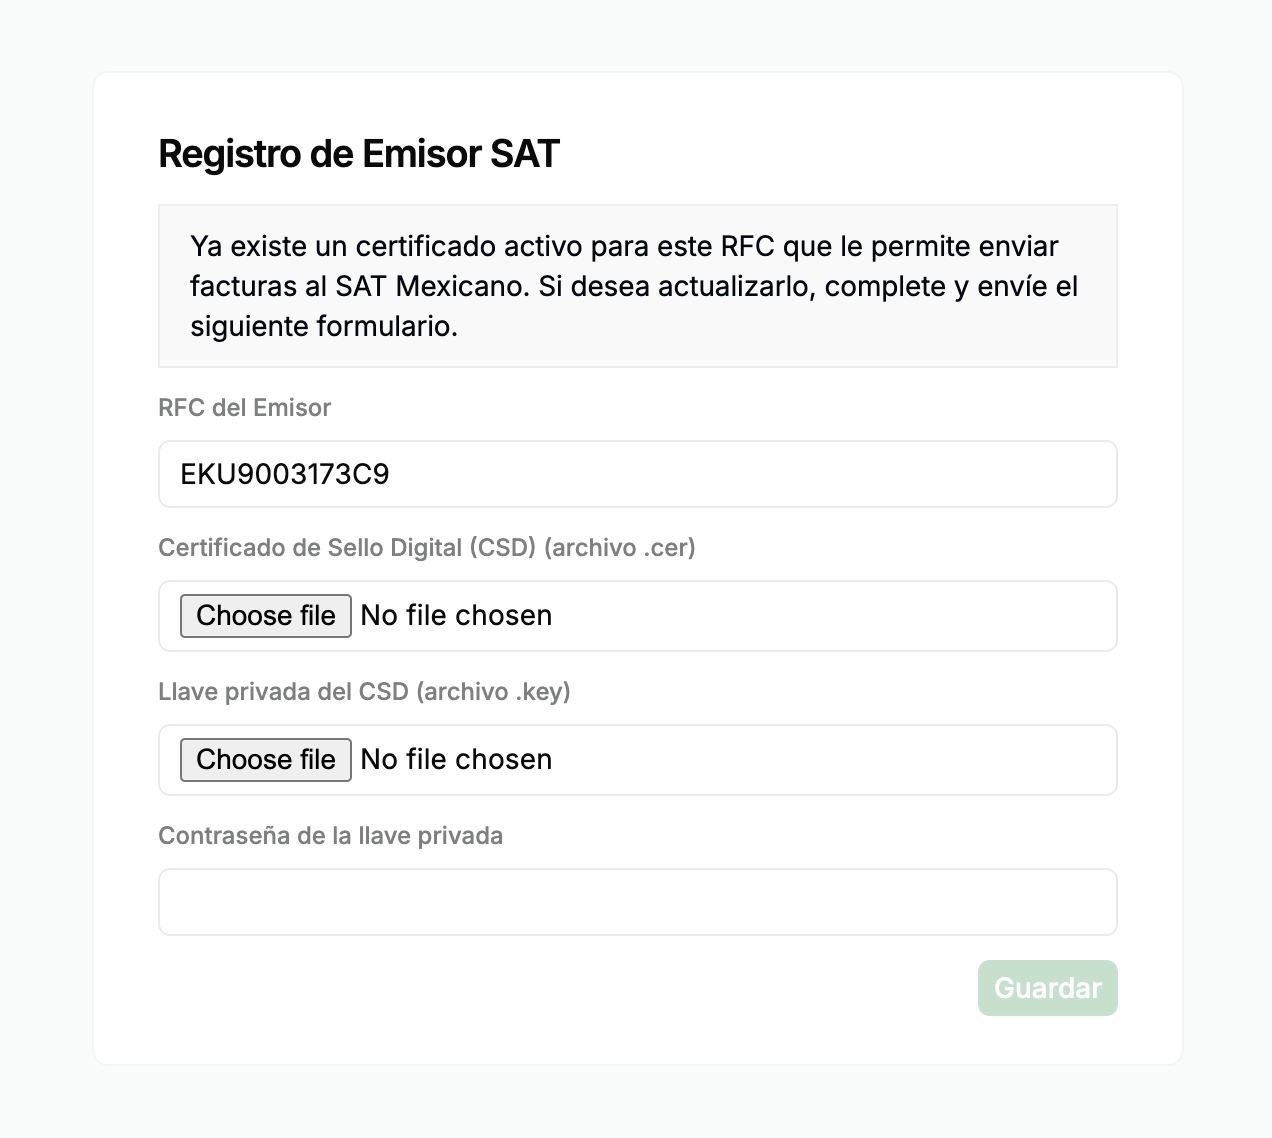
.crt), private key (.key), and the private key password.Follow this guide to generate the CSD certificate and key.When you click Save, the form details are securely sent to the PAC (Proveedor Autorizado de Certificación), who will handle invoice signing and submission to the SAT.You can fill the form via API by sending a PUT request to the registration link. The payload should be a JSON object with the following fields:
csd_file(string): The CSD certificate file (.crt).key_file(string): The private key (.key).password(string): The private key password.
rfc(string): The RFC of the supplier.active_cert(boolean): Whether the certificate is active.
3
Authorize PAC to Issue Invoices
Since we are using a local PAC, you must authorize the PAC to sign, stamp, and send CFDIs to the SAT on your behalf.To do this, visit the following page and sign the manifesto using your e.firma (FIEL).
Send an Invoice
The following examples are of partial GOBL documents you can copy and paste directly into the Invopop Console or store via the API as silo entries. GOBL Invoices sent to the SAT require the following properties in order to perform the correct normalization and validation steps. Invopop will try to assign these automatically, but we recommend defining them explicitly before upload:$regimeto be set toMX$addonsto includemx-cfdi-v4
B2B Invoice (Personas Morales)
B2B Invoice (Personas Morales)
This main type of invoice is a standard B2B invoice from a Mexican supplier to another Mexican customer.Notice:
- we’ve added the
mx-cfdi-v4addon, this ensures the document will be validated using the CFDI v4 rules built into the GOBL library, - extensions (
ext) fields have been used in multiple locations for fields whose values cannot be determined any other way, - VAT will be applied at the standard rate, the percentage will be set automatically, and,
- there are no totals nor calculations, all of these will be made automatically when uploading.
SAT B2B Invoice
B2C Invoice (Personas Físicas)
B2C Invoice (Personas Físicas)
This is a standard B2C invoice from a Mexican supplier to a Mexican physical person with tax details, but no specific tax declaration requirements. This would be for a larger sale when the “Simplified” and “Global Invoice” do not apply.In addition to the observations for regular B2B invoices, note in the customer:
- the presence of an RFC in the same format as for companies, and,
- the
mx-cfdi-fiscal-regimeandmx-cfdi-useextensions have been set to616andS01respectively reflecting that the customer is not subject to tax.
SAT B2C Invoice
Simplified Invoice (Factura al público en general)
Simplified Invoice (Factura al público en general)
In Mexico, a General Public Invoice (Factura al Público en General) is a type of tax document issued to record sales made to customers who do not request an invoice with a specific Federal Taxpayer Registry (RFC) number. Instead, a generic RFC is used to identify the recipient:
- XAXX010101000 for domestic transactions
- XEXX010101000 for foreign transactions
- the
customerfield is not required - the
$tagsfield is used to identify this as a simplified invoice.
SAT Mexico simplified invoice example
Global Invoice
Global Invoice
The Global Invoice is used to group a set of invoices into a single CFDI document.Notice:
- the
$tagsfield has been used to identify this as a global invoice, - each
linehas arefwhich is used to identify the invoice that it belongs to, - the
tax.ext.mx-cfdi-global-month,mx-cfdi-global-period, andmx-cfdi-global-yearfields have been used to identify the global invoice period.
SAT Mexico global invoice example
Credit Note
Credit Note
The Credit Note is used to cancel an invoice.Notice:
- the
$typefield has been set tocredit-note, - the
precedingfield has been used to identify the invoice that is being cancelled.
SAT Mexico credit note example
FAQ
Please contact the Invopop support team if you have any questions that are not listed here.Which PAC (Proveedor Autorizado de Certificación) does Invopop use?
Which PAC (Proveedor Autorizado de Certificación) does Invopop use?
Invopop uses SW Sapien, an Authorised Certification
Provider (PAC), to sign and stamp CFDI documents for the Mexican tax
authority.
Where can I find the mapping of GOBL fields to CFDI?
Where can I find the mapping of GOBL fields to CFDI?
The library that transforms GOBL into CFDI documents is publicly available as an open-source project and can be found at github.com/invopop/gobl.cfdi.For further details on how GOBL prepares data for conversion, see the Mexico Tax Regime.
How do I issue invoices with the 8% tax rate in border zones?
How do I issue invoices with the 8% tax rate in border zones?
In Mexico, a reduced VAT rate of 8% applies to transactions in border zones (northern and southern border regions). To successfully issue invoices with this rate, both of the following conditions must be met:
- The supplier’s RFC must be enabled by the SAT to invoice with the reduced rate in border zones.
- Both the
mx-cfdi-issue-placefield and the customer’s postal code (when included) must correspond to border zones.